

카이로케어, 혁신적인 아이디어로 탄생한 5가지 상품 분석: 장점과 단점 비교
| 추천 상품 순위 정보 |
|---|
| 🔹 1위, 카이로케어 목 운동기 카이로핏, 1개 |
| 🔹 2위, 카이로케어 카이로넥 바른목 운동기, 1개 |
| 🔹 3위, 카이로케어 커브넥, 민트, 1개 |
| 🔹 4위, 카이로케어 굽은목 운동기 카이로핏 코코아골드, 1개 |
| 🔹 5위, 카이로케어 커브넥 코랄, 민트, 1개 |
| 🔸 게시물 삭제 안내 |
안녕하세요! 소문난
카이로케어에 대한 상품 TOP5개 상품을 추천해드리려고 합니다.
👍 판매량이 많은, ⭐ 후기도 좋은, 💰 가성비도 좋은 카이로케어 상위 5개 제품 확인해보세요!
클릭하시면 카이로케어에 대한 더욱 자세한 제품 정보를 보실 수 있습니다.
📋 카이로케어에 대한 상품 5개를 선정해봤어요!.
🔍 제품의 특징을 확인하시고, 🛒 원하시는 제품을 선택해보세요!
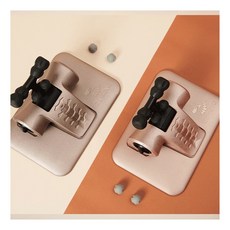
카이로케어 인기 후기 Top5 1위
카이로케어 목 운동기 카이로핏, 1개
209,000원
189,000원
(9%)
⭐ 4.0점 | 💬 34개
로켓배송: 🚀가능🚀
🔍 제품의 특징을 알아보아요 🔍
✔️ 목 운동을 통해 굽은 목 교정 및 목 통증 완화에 도움
✔️ 꾸준한 사용으로 목 근육 강화 및 자세 개선 효과
✔️ 휴대하기 간편한 디자인으로 언제 어디서든 사용 가능

카이로케어 인기 후기 Top5 2위
카이로케어 카이로넥 바른목 운동기, 1개
208,000원
163,390원
(21%)
⭐ 4.0점 | 💬 12개
로켓배송: 🚀가능🚀
🔍 제품의 특징을 알아보아요 🔍
✔️ 목의 움직임을 제한하여 바른 자세 유지 돕는 목 착용형 운동기
✔️ 다양한 강도 조절 기능으로 사용자의 목 상태에 맞춤 설정 가능
✔️ 편리한 착용감과 뛰어난 내구성을 자랑
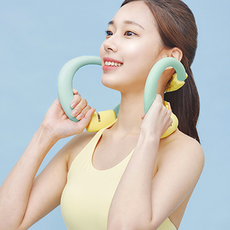
카이로케어 인기 후기 Top5 3위
카이로케어 커브넥, 민트, 1개
99,000원
64,000원
(35%)
⭐ 4.5점 | 💬 46개
로켓배송: 🚀가능🚀
🔍 제품의 특징을 알아보아요 🔍
✔️ 목 뒷부분을 지지하여 바른 자세 유지 및 목 통증 완화
✔️ 부드러운 소재 사용으로 편안한 착용감 제공
✔️ 다양한 색상으로 선택 가능하여 취향에 맞게 선택 가능
카이로케어 인기 후기 Top5 4위
카이로케어 굽은목 운동기 카이로핏 코코아골드, 1개
209,000원
198,450원
(5%)
⭐ 4.5점 | 💬 8개
로켓배송: 🚀가능🚀
🔍 제품의 특징을 알아보아요 🔍
✔️ 고급스러운 코코아골드 색상으로 디자인 만족도 높음
✔️ 굽은 목 교정 및 목 통증 완화에 효과적인 운동 지원
✔️ 컴팩트한 사이즈로 보관 및 휴대 용이
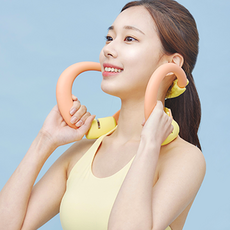
카이로케어 인기 후기 Top5 5위
카이로케어 커브넥 코랄, 민트, 1개
99,000원
69,500원
(29%)
⭐ 4.5점 | 💬 3개
로켓배송: 🚀가능🚀
🔍 제품의 특징을 알아보아요 🔍
✔️ 코랄과 민트 색상의 조합으로 세련된 디자인
✔️ 목 라인을 슬림하게 보이도록 돕는 디자인
✔️ 편안한 착용감과 통풍성으로 쾌적한 사용 가능
이 글은 파트너스 제휴활동으로 일정 수익을 지급될 수 있습니다 !
📧 게시물 삭제 요청 📧
상표권&저작권에 문제가 되는 게시물 삭제에 관하여 메일로 문의를 보내주시면 감사하겠습니다.
💌 메일주소 💌
ghrms6320@naver.com